As an Amazon selling partner, sellers have the chance to connect with millions of buyers in more than 180 countries. Around the world, Amazon has more than 1.9 million selling partners and over 30 million active customer accounts.
A 45% growth from 2019 saw the launch of more than 200,000 new third-party sellers worldwide on Amazon in 2020. Having the appropriate Amazon seller tools and resources is important for management and growth, whether you are an entrepreneur wanting to launch a new firm or operate an existing one.
You will have the opportunity to interact with countless customers and expand your business by using the Amazon Seller Central features.
Knowing the proper tools before you begin is essential if you have decided to sell on Amazon. You can manage your online sales with the assistance of Amazon Seller Central. This article covers how to use the Seller Central dashboard, the registration process, the fee schedule, information about Amazon sellers, etc.
Quick Guide
- What is Amazon Seller Central?
- How to Register on Amazon Seller Central
- Amazon Seller Central Login Details
- Different Types of Selling Plans
- Amazon Seller Fees and Pricing
- What are Amazon Seller Central and Vendor Central
- Different features in Amazon Seller Central Dashboard
- Familiarize with Buyer Seller FAQ
- Conclusion
What is Amazon Seller Central
Amazon Seller Central is your go-to tool for managing sales successfully and for selling in Amazon’s stores. It provides a summary of your performance data and aids you in completing significant account-related tasks.
With the aid of useful tools and material, Amazon Seller Central enables you to manage your seller account and expand your Amazon company from a single practical dashboard. You can log in to keep track of your Amazon sales activity and many more.
Before you start your career becoming a seller, it is advised that you take the time to understand the complexities of Amazon’s Seller Central. Your efforts in this area will succeed in the future.
How to Register on Amazon Seller Central
To create a seller account, follow these steps. After determining which plan to select, complete the registration procedure as mentioned below.
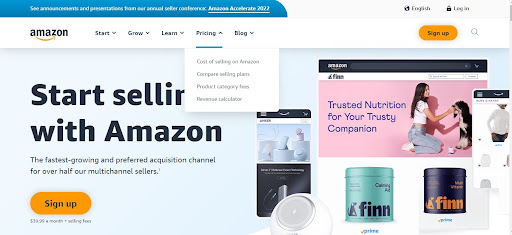
1. Please visit: https://sell.amazon.com/
2. If you’re unsure about the plan you want, click “Pricing” and “Compare selling plans” to learn more about available selling plans. You can view the difference between individual and professional accounts on this page.
You will find two options to choose from – ‘Sign up for Individual’ or ‘Sign up for Professional’
Be aware that clicking the “Sign Up” button will take you to the professional seller registration page.
3. Click “Create a New Account” after entering your email.
After selecting your seller plan, a new window will open where you must enter your email address and a password of your choice to increase a seller account.

Once you have filled in the details, click ‘Next’
After a few seconds, you will be sent to another page where you must confirm the acceptance of a notification that was sent to the email address you provided on the previous page. Amazon validates the email you provided in this manner.
Make sure you approve the notification when you receive an email from Amazon. You will then be immediately sent to the next page.
4. Select your ‘Business Type’ and ‘Business Location’
You must give the following details during the next procedure, which is the registration for Amazon sellers.
Business Location: Here, you must select the nation in which your company is based.
Business Type: Amazon offers you several options. Choose your business entity accordingly.
The options include:
- State-owned business
- Publicly-owned business
- Privately-owned business
- Charity
- No, I am an individual
Choose “None, I am an individual” if you haven’t yet established a business. By selecting this, Amazon will request your complete name on the next page.
5. Your full name:
Please provide your full name, including first, middle, and last. Then choose ‘Agree and continue
You will need to submit your personal information on the next screen identification details. (Driver’s license or Passport number)
Make sure you give the right address because Amazon will send a postcard with a verification number to your address. All of these specifications have to be provided for verification.
You can select ‘Next’ after providing all the necessary information.
6. Type in your payment details
7. Your next step is to give the billing details. Add a legitimate credit card and a valid bank account number.
To continue, choose ‘I Understand’
You will be required to confirm your bank account on the next page.
You must input your credit card information after confirming your banking information.
Include details about your items and Amazon store.
8. When your credit card information has been authorized, you will be questioned about your Amazon store and the products you wish to sell.
You must respond to the following questions before proceeding to the next step of the Amazon seller registration process:
- Enter the name of your store
- Whether or not your items have a UPC If you hold a certificate of diversity
- Are you the manufacturer or brand owner for any of the products you sell
When you’ve finished answering the questions, click ‘Next’
9. Authentication of identity
You will next be required to upload photos of your ID (license or passport) and a bank statement to confirm your identification.
Click ‘Submit’ once your documents have been uploaded.
The business address you previously supplied will need to be verified once you’ve finished all the other stages in the verification process.
A new screen will show up once you click the ‘Confirm’, explaining that you will get a postcard with the verification code at that address.
10. To complete the verification procedure, type the supplied code into the ‘Enter code below’ area, after receiving the card and click ‘Next’
After being verified, you are in.
We advise using 2-step verification on your account for further protection just to be cautious. However, all you need to do to get started is sign in to the Seller Central account link once your identification and business information has been validated.
Amazon Seller Central Login – Guidelines
Here is a list of guidelines to log in to your Amazon Seller Central account.
Use a valid email address and password
You only need your assigned email address and password to log into your current Amazon Seller account.
Sellerapp is created to help Amazon sellers with their data, intelligent automation, and operations. Use Sellerapp to get critical business insights to scale your business.
Two selling plans – Professional and Individual
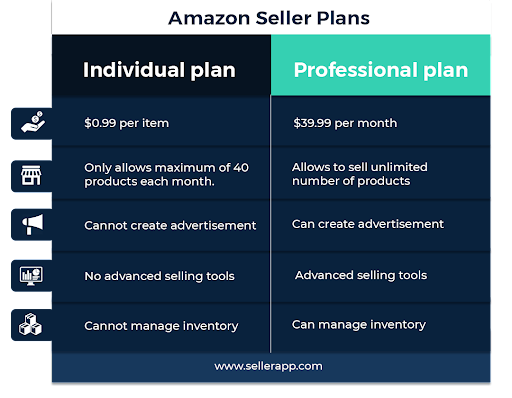
Amazon sellers can choose an individual or a professional plan. These two plans may be divided into standard and premium categories. Before beginning your sale, you may pick the right plan for you.
Regardless of how many products you sell, the individual plan costs $0.99 per sale and the professional plan costs $39.99 each month. Individual plans only allow you to sell a maximum of 40 products each month, whereas professional plans allow you to sell an unlimited number of products. Your product can be advertised only in a professional plan.
In addition, if you want to achieve top positioning on Amazon product detail pages. Then you should have advanced selling tools, such as APIs and reports, which are available only in a professional plan.
Amazon’s Individual selling plans, however, let you choose what to sell. You cannot use advanced marketing tools or advertise your product. It would be wiser to select a professional plan if you wish to sell more products. You may modify your plan at any time, regardless of the one you select. Whatever plan you decide on, you are always allowed to change it if you change your mind.
Amazon Seller Fee and Pricing
Referral Fee
The referral fee is determined by the product’s category. For each item sold on Amazon, a referral fee is assessed. In general, the referral fees will range from 8% to 15%.
Fulfillment Fee
Fulfillment fees depend on whether you decide to ship your product by yourself or use fulfillment by Amazon (FBA) which will handle your logistics and offer prime shipping for your products.
The fulfillment fee differs by Amazon or seller.
Amazon FBA fees are charged per unit. It includes choosing and packaging your orders, shipping, and handling, providing customer support, and processing returns, among other things. These charges are mostly determined by the product’s weight and size.
Amazon charges shipping costs when the sellers complete their orders based on the product category and the delivery method which is selected by the customer. Then the shipment amount is credited to the seller.
This may also change depending on whether you have a individual or professional plan.
Professional sellers can choose their delivery costs. You get a credit from Amazon that is equal to your shipping cost when a consumer purchases your product.
Sellers with individual plans, however, use the fixed delivery prices that Amazon has set for all of the items. It is necessary to set prices for the items so that you can make a profit because individual sellers will be required to ship orders at the specified rates even if the shipping credit is less than the overall shipping expenses.
Other Fee
Sellers may have to pay additional fees for options like premium account services or advertising.
What are the Amazon Seller Central account and Vendor Central account
Amazon Seller Central refers to the web interface that brands and merchants use to list and sell their products directly to customers.
Anyone with access to a seller account is welcome to use Amazon Seller Central. You can sell directly to your Amazon consumers using Amazon Seller Central. They provide speedy payment terms and flexible logistical choices. They have better advertising possibilities and stronger brand materials. Amazon Seller Central is considered a marketplace or a third-party Amazon seller.
Vendor Central, on the other hand, refers to the usage of the web-based Amazon Vendor Central interface by manufacturers and distributors. It is an invite-only option. If you sell your goods through vendor central, you are considered a first-party seller. In this account, you sell your products directly to Amazon, which then sells them to the end customer. They have enhanced A+ content, advertising, and other marketing tools.
Related post: Difference between Amazon Seller Central vs Vendor Central
How to navigate your Amazon Seller Central dashboard
The Amazon Seller Central dashboard has multiple features which make it easier for Amazon sellers to do business transactions through its advanced user interface. You can get more information from each feature.
You can quickly review all of the features and what they let you accomplish here.
Catalog
This feature will help you add products to your store. You can also manage item data and attributes like brand name, material, color, etc.
Inventory
This feature will make sure you have the right amount of items available to fulfill customer orders.
Orders
Organize and complete your clients’ orders. This feature will help you to track your orders.
Advertising
You can create advertising campaigns to market your products. You can pick from a variety of ad alternatives on Amazon.
Stores
This feature will help you create a store of your own on Amazon’s marketplace. This will provide your business with a page on Amazon of its own, which you can personalize and promote.
Reports
Check out Amazon statistics for your payment, fulfillment, advertising efforts, and more. To assess how you’re doing and what progress you have made, check in frequently.
Services & Apps
Install the Amazon Seller app to make managing your business easier. There are several options in the Amazon app store that might help you to manage your business from your phone, including tracking sales, fulfilling orders, finding things to sell, responding to questions from customers, etc.
Familiarize yourself with Buyer – Seller Messages FAQ
Communication between buyers and sellers on the Amazon platform is facilitated through the buyer-seller communications page. It enables the buyers and sellers to interact with one another in methods that serve to safeguard both parties’ privacy, by encrypting email addresses.
The encrypted email address can be used by sellers in the same way as a regular email address. Additionally, the anonymous email alias is used in all upcoming communications with the same buyer. For each seller connection, a specific email alias is given to the buyer.
Conclusion
Understanding the various features of Amazon Seller Central will give you information about your Amazon business. You will progress and find additional features as you learn your way. There are several aspects of sales at Amazon Seller Central. I hope this guide will assist you in understanding what you can accomplish in Amazon Seller Central.